Monday, October 31, 2011

Diwali Dress


Diwali is known as festival of lights. Diwali falls on the full moon night between mid october and mid november. This year it was on 26th october 2011.

Diwali signifies the renewal of life, and it is common to wear new clothes on the day. Today I am sharing here the Diwali special dress I made for my little one. It is worked in two different color yarns from top to bottom with ruffles all the way down.  It was not so easy to work with the ivory color yarn which has a light color shining yarn crossed along with it. The maroon(brocade) color yarn was so soft to work with ad it did go so well with the ivory color. Ruffle rows does consumes a bit of time.But the end result is really worth it. It just makes a perfect party wear.
 

You can find the tutorial for the Mens Kurta seen here @ http://www.dewdropsdesigns.com/2011/10/kurta-for-men.html

 
You can find this dress for sale @ Etsy shop: Ruffle Dress

Kurta for Men

Every time I post here something for baby girl or women. So this time there is a change in my routine. This is something for men.
It was on the day before of the Diwali celebrations it came up to my mind why not make some ethnic wear for my husband. I have never tried sewing men wear or accessories till date. Even after buying the fabric I was not so sure about how it is gonna turn out. I bought 2.25yds of the fabric from Hancock fabrics. You can find the one I used here Satin Fabric

I am quoting here in few pictures and some details about how to make this kurta.
First do take a t-shirt that loosely fit for the one who you are making it for. This is just for shoulder and arm hole measurements. Rest of the measurements you have to take.
1) Measure from shoulder to knee or till where you want the kurta: A
2) Shoulder to Wrist : B
3) Hip : C
4) Shoulder to Hip : D

Front and Back
Now Mark your fabric with the measurements you have taken now as shown in picture for front and back and cut it.
Cut 2 pieces for plackets. You can find tutorial here : Placket tutorial . Or else there are many tutorials in youtube on how to make plackets.

Attach the shoulder for front and back pieces with right sides facing. Now add the plackets for desired length. I have made 8" placket with 3 button. You can create button holes with hand or with machine if you have a machine that supports button hole creation. Also add the buttons. 

Hands:

Now that you have the front  and back piece with the plackets done it is time to give hands for the kurta
Cut 2 pieces for the hands with length B from centre of the piece, arm hole width can be measured keeping the arm hole of the front  and back piece created just now and the width at the wrist should be few inches less than the top arm hole width. This  you can measure using any full sleeves shirt that fits best and just add or reduce width based of what you prefer.

Now attach along the sides leaving around 12" at the bottom to add side opening. Even this opening size is completely left to your choice.. I have made 12 " side open. 

Collar
Now the only piece left out is for the collar. Take the neckline measurement from where you want the collar to start from to where it should end. Now add 1/2" for seam allowance. Width for the collar piece should be 2.5 " for 1" wide collar. Also cut an interfacing material for collar which is 1" wide * length of the collar piece excluding the seam allowance. Now fold the piece width wise with right sides together. Sew along the end with 1/4" seam allowance at bottom and one side . Now turn it right side out. Tuck in the interfacing you have cut out inside the piping you just made and close the opening edge foding it to inside. Now attach this to neck .  Finally hem the ends of hands and the bottom . Also dont forget to sew the open sides before working on bottom hem.

If you do have serger it would be really help in finishing the seams..

SO now you are done with making Kurta.. Do comment if you need any help or any step is misleading you. Happy Sewing ....


Tuesday, October 25, 2011

Newborn Gift Set

"You give but little when you give of your possessions.It is when you give of yourself that you truly give" A well said quote..This dress outfit is for babies 0-3 months.. The booties and the hat will fit for babies 0-6 months. I have made it with baby soft yarn , colors white pompadour and Baby Pink Pompadour. This is for the first time I am working with baby soft yarn. I have used steel hook size 3.25mm. So it took me a while to finish this . Working with bigger size hooks are always easier compared to small size hooks. The dress is completely worked with single crochet,extended single crochet, double crochet... I have made shell stitch at the end to give edging... The hat is made with ruffles at the end.. Overall I am happy with how it came out.. I don't have the photographs of the baby wearing the dress. If I can get one  I will surely update this post with it.. So let me sign off this time.... Next in progress is Crocheted Dress ruffle dress.It is  almost done.. Will be updating soon...


You can find this for sale @ Etsy Store: Newborn Gift Set

Wednesday, October 19, 2011

Ruffle Dress in Red


Yet another ruffle dress. This is a simple dress to make. This dress is made from knit fabric with 50% stretch on both sides. My inspiration for this dress is the cupcake dress from J Crew(pic shown at the end)... But I made few modifications for the same. Instead of 2 ruffles at the top I attached a flower . I have added step by step pictures for making this dress. For Ruffles Cut 4 pieces of fabric 3" wide * 2x (x is marked in the picture).  The dress is made for 9-12 months size.. 


I bought this fabric from Hancock. It was just $2 for yard. 


Friday, October 14, 2011

Crochet booties


Sole


Just before adding straps and buttons...


Crocheting is turning out to be a real fun hobby for me these days. trying on new patterns and designing new stuffs it just keeps me going on all day. Unlike knitting crochet can never be done by machine and is always handmade.


     I just finished making cute booties for my baby. This is the first time I am making booties. I really was not sure how it was turning out to be. But it looks cute and I am happy about it.. It is worked all the way from sole to strap as just one piece, no seams required. Yeah that is the best part I love about it.. I hate doing stuffs with so many pieces and finally attaching the seams.. SO In most cases I try my best to finish everything in one piece.  For this I used 100 % acrylic yarn in off white  color for sole and straps, 100% Acrylic yarn in red for the rest of the booties.. The hook used is size G(4.25mm).


Tuesday, October 11, 2011

Simple Shoulder Bag


Add caption


Just before working on handle & straps...
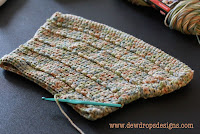
Bottom part of bag
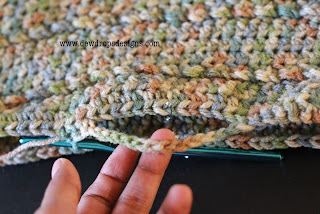
Chains added for handle
Before adding shoulder straps


Bags, yes that  tends to be a weakness for a big percentage of women around the world... Yeah even I am one among them.. This is a medium size shoulder bag I have made using worsted weight  100% acrylic yarn.. The hook used for the same is J(6.00mm). The bag measures 11" long and 10.5" wide at top and 15" wide in base. The bag is worked from bottom up as one piece  decrementing stitches as you go up.. I have used seams only for the straps.


Pattern:


Note: I would suggest using 100% Cotton Yarn. Avoid using soft yarn..

Ch 55

Row 1: sc in second ch from hook and each ch across, turn(54sc)
Row 2: ch1, sc in ech sc across turn (54sc)
Row 3- 5: Repeat row2

Note:  All rows from now on should continue around and should not turn…

Round 6: sc in each sc across(54sc), 5 sc along sides, sc along the bottom of chain    (54sc) continue sc along side (5sc) . Total 118sc
Round 7: sc in first sc of row6 and continue doing sc in each sc across.(118sc)
Round 8- 9 : Repeat row 7
Round 10 : Hdc across every sc ( 118hdc)
Round 11: sk first hdc,*(sc, ch2, hdc) in next st, sk next st, Rep from * across ending with sc in last hdc.
Round 12: 2 sc in first st, then keeping ch2 sts from previous row S-edge clusters in front - 2 sc in BACK LOOP ONLY of each sc across ch 1 turn
Round 13: hdc around
Round 14: HDc around with 10 decrement hdc  in equal distance around( 108hdc)
Round 15-16: Hdc around (108 hdc )
Round 17- 19: Repeat Row 11-Row13
Round 20: HDc around with 8 decrement hdc  in equal distance around . (100hdc)
Round 21-22 : Hdc around (100hdc)
Round 23-25 : Repeat Row11-Row13
Round 26: Hdc around with 6 decrement hdc in equal distance around (94hdc)
Round 27-28: HDc around (94hdc)
Round 29- 31: Repeat Row 11-Row13
Round 32-34:  Hdc around (94hdc)
Round 29- 31: Repeat Row 11-Row13
Round 32:    hdc around (94hdc)

Handles

For handles Mark the centre stitch on both side of the bag, then place markers 5stitches away from the centre on left & right for both sides of the bag.

Round 33: sc around till marker , ch 10, continue sc around till next marker, ch 10, continue sc
Round 34: Sc to first sc of last row, sc till the chain, 10sc in ch, continue sc till next ch, 10 sc in ch, continue sc till end..
Round : 35-37: sc around..  Fasten off..


Shoulder Strap :

Attach yarn where you want the shoulder strap to be then ss to 5 stitches along then ch 1 turn,

Row1: sc in 5sc , turn
ROw 2: ch 1, sc in next 5 sc turn

Now continue row 2 until you reach the desired shoulder strap length for your bag. NOw ss to the opposite side of the bag in 5 stitches. FInish off. Weave in ends..

Please feel free to leave a comment if you come across any problems in this pattern..

I will be glad to help you out...