Friday, September 30, 2011

Hat with brim


Just happened by chance. Will try to write a pattern for the same... Few yarn was left over after making the baby set. So made this hat with brim. The top part is completely worked with dc. Brim with sc. Also added few hdc in between. Quiet happy with the final outcome.

Pattern:

Yarn: Worsted Weight Yarn(cotton)
Avoid soft yarns if you want the brim to stay well
Hook: I(5.5mm)

Top Round:

Round 1: Magic ring.  Ch2 (does not count as dc) 12 dc in ring. Join with a slipstitch in first dc. (12 dc)
Round 2: Ch 2, 2 dc in each st. Join with a slipstitch in first dc. (24 dc)
Round 3: Ch 2, (dc in next st, 2 dc in next st) repeat around. Join with a slipstitch in first dc. (36 dc)
Round 4: Ch 2, (dc in next 2 st, 2 dc in next) repeat around. Join with a slipstitch in first dc. (48 dc)
Round 5: Ch 2, (dc in 3 st, 2 dc in next) repeat around. Join with a slipstitch in first dc. (60 dc)
Rounds 6: Ch 1, sc in each st around. Join with a slipstitch in first sc. (60 sc)

If you want the hat to be bigger add one more dc increment & Sc round here.

Bottom:

Round 7: Ch 2, dc in each st around. Join with a slipstitch in first dc. (60 dc)
Rounds 8 : Ch 1, sc in each st around. Join with a slipstitch in first sc. (60 sc)
Rounds 9 : Repeat 8
Round 10-13: Ch2, hdc in each st around. Join with a slipstitch in first hdc. (60 dc)
Rounds 14: Ch 1, sc in each st around. Join with a slipstitch in first sc . Increment 6 sc around              in uniform manner(66 sc)
Rounds 15 : Repeat 14 without increments (66 sc)
Round 16: Ch 2, dc in each st around. Join with a slipstitch in first dc. (66 dc)
Rounds 17: Ch 1, sc in each st around. Join with a slipstitch in first sc (66 sc)
Rounds 18 : Repeat 17

Brim:

Round 19: Ch 1, sc in each st around. Join with a slipstitch in first sc . Increment 4 sc around in uniform manner(70 sc)
Round 20: Repeat 19, no increments (70sc)
Round 21: Ch 1, sc in each st around. Join with a slipstitch in first sc . Increment 10 sc around in uniform manner(80 sc)
Round 22: Repeat 21, no inrements (80 sc)
Round 23: Ch 1, sc in each st around. Join with a slipstitch in first sc . Increment 10 sc around in uniform manner (90 sc)
Round 24: Repeat 23, no increments. (90 sc)
Round 25: Ch 1, sc in each st around. Join with a slipstitch in first sc . Increment 10 sc around in uniform manner (100 sc)
Round 26: Repeat 25, no increments (100 sc)

 In case if you come across any error do let me know.


Layering Top


I started with this top a while ago. But after completing the yoke just kept away. I was following the pattern from coats and clark fancy vintage top. But by mistake I was working with hook E instead of
H all the way for yoke. I noticed it only when I was supposed to join the armholes, and another mistake I did was I did not check the gauge in the pattern. So at this point I just gave up doing it for some time. Last day I took it back added few more extra rows for the yoke and completed the pattern to fit for me. If you would like to give a try on this top check out the pattern @fancy vintage top.


Make sure not to make mistakes like me. :)


Thursday, September 29, 2011

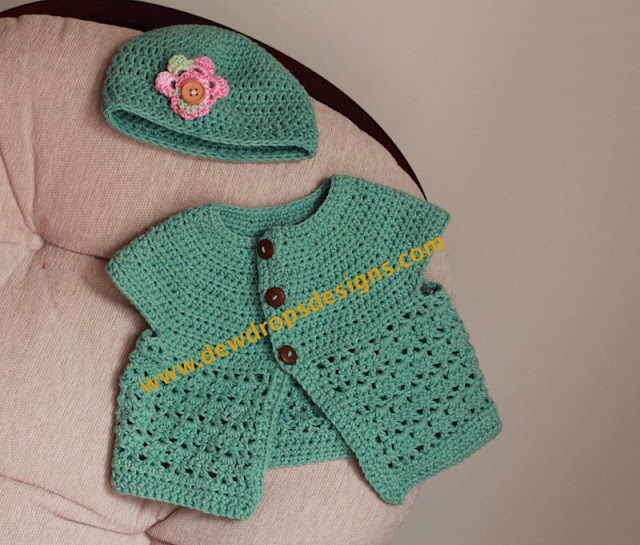
Baby set


Summer passed by in the blink of an eye. The winter is just weeks away. So just thought will give a try on making a hat and sweater for my little one. I have used lion brand(worsted weight) 100% cotton yarn to make this set. http://cache.lionbrand.com/yarns/kitchen.htm
color: seaspray. I bought it from Hancock fabrics on sale. 

Hat pattern:

Round 1: Magic Ring ch 2.,(Or Ch 4 slip st)   10hdc in ring.  join to top ch of ch 3.
Round 2: Ch 1. 2 sc in each hdc around. (20 sc)  Join to ch.
Round 3: Ch 2.  *2 hdc in next sc.  Hdc in next sc.  Repeat from * around. (30 hdc)  Join to top ch of ch 3.
Round 4: Ch 1.  Sc around.  (30 sc)  Join to ch.
Round 5: Ch 2  *2 hdc in next sc.  Hdc in next 2 sc.  Repeat from * around.  (40 hdc)  Join to top ch of ch 3.
Round 6:  Ch 1.  Sc around.  (40 sc)  Join to ch.
Round 7:  Ch 2.  *2 Hdc in next sc.  Hdc in next 3 sc. 2 Hdc in next sc, Hdc in next 4 sc* Repeat from * around.  (50 hdc)  Join to top ch of ch 3.
Round 8:  Ch 1.  Sc around.  (50 sc)  Join to ch.
Round 9:  Ch 2.  Hdc around.  (50 hdc)  Join to top ch of ch 2.
Round 10: Ch 1.  Sc around.  (50 sc)  Join to ch.
Rounds 11: Ch 3, Dc around (50 dc) Join to ch 3.
Round 12-13 : Repeat Rnd 11.
Round 14: Repeat Round 9
Round 15-16 Repeat Round 11. Also decrease 4 dc across.(total 46dc)
Round 17 : Repeat round 9.(46dc) Fasten off and weave in ends...

Flower Pattern:
Round 1 - ch 10, join with ss to 1st ch.
Round 2 - * ch 3, sc in ring*. repeat from *-* 8 times.
Round 3 - ss in first ch3 space, ch1, 3 sc in same space and in each ch3 space around, slst in beg ch1.
Round 4 - *[1sc, 1dc, in first sc][2 trbc in second sc][1dc, 1sc in third sc] in each set of 3sc*. repeat from *- * 4 times . join with slst to first sc. Fasten off.

The pattern was written after completing the hat. SO let me know if you come across any problems.

You can find the pattern for sweater in the link below:

I have made few modifications for the pattern as follows:

Hook Size : I 
Yarn : Worsted Weight

Starting chain 48

Just before working on armholes

I made 9 lace rows instead of 12 and next 3 rows I did sc around.
I did not do the sleeves now. I might  do it later stage if required.


Arm holes added and working on lace rows


Completed sweater with buttons added.

Friday, September 16, 2011

Skirt

Final look....
6 pieces marked to cut
 This is my trial with sewing skirt for first time..  I am quoting the instructions to do this skirt here. This is stretch fabric I bought from jo-ann store clearance section for just $3 for yard.


Here I give the details based on my measurements. You can modify it for any size.

You can use cotton/knit or any other fabric which you think works best for a skirt.


Finishes waist/hip (the size of the skirt where it stays): 32"

Length: 21"

Materials :
Fabric 45" wide: 1 1/4 yard, Thread , Sewing machine...

Attach 3 pieces together as shown for front and back. Then attach front and back

sewing the back and front pieces together

Waist band sewn with right side together
Instructions:


1) Take your waist/hip(depends on where you want the skirt to stay) measurement. let it be X ( for me it was 32").
Cut 6 pieces of fabric as in picture: for  each piece top part should be X/6 + 1/2"(for seam allowance).
 bottom should be  2*(X/6) + 1/4 + 1/4" (seam allowance on both sides)

2) Cut another piece for band.( If you are using stretch fabric you can make the yoga pant style band for skirt else you can use elastic inside your waist band..)
a) if stretch fabric cut waist band:   4" + 1/2" width by length (just make it few inches shorter than your waist size depending on the stretch of the fabric)

b) if non stretch fabric: cut 4" + 1/2" wide *  X +1/2" length for waist band. Also take elastic few inches less than X based on stretch of elastic.

Now sew the 6 pieces together with right side facing.. SO now you are almost done with just bottom hem and waist band left. Also one you are done with sewing 6 pieces together just check to see if the measurement on top of the skirt that is formed now is X" long.

Next is to sew along the waist band that you have cut to the skirt and hem the bottom at the end..


So that is all with this skirt. Hope it is easy to do...


If you come across any issues in between. Just put a comment and I will be happy to help...
Happy sewing ...

Tuesday, September 6, 2011

My New Top


Me at Smoky Mountains in my new top...
Attaching sleeves

Sleeves attached and ready to add ruffled neckline

Ruffle created for neck line
So here is one more creation for me.. It was a quick sew I did on Friday night. I bought this knit fabric from Hancock fabrics for jut $3/yd.. It was a good deal  I think..

I took the measurement from a t-shirt that fits good for me to make this one.. I was happy the way it came out.. Ruffle neckline just helped me get out of the trouble in making a perfect neckline.
Check the tutorial for the same @ http://www.makeit-loveit.com/2009/10/womens-shirt.html

Thursday, September 1, 2011

Crochet Book


" The Complete Photo Guide to CROCHET" by Margaret Hubert.
Just had a quick look through this book. Good one. You can get idea of different types of crochet stitches and few good patterns to work on with the different stitch patterns... I loved this book..

The color picture representation on every stitch is a plus. There is also details on how to read a pattern(both wrtten and picture representation).